Guide to Installing WordPress Themes: A Comprehensive Step-by-Step Tutorial
Guide to Installing WordPress Themes: A Comprehensive Step-by-Step Tutorial
Your WordPress website’s appearance and functionality are largely defined by its theme. A well-chosen theme can transform a basic site into a professional, engaging, and user-friendly experience, reflecting your brand and attracting your audience. Whether you’re launching a new site or giving an existing one a fresh look, installing a WordPress theme is a fundamental skill every site owner needs to master.
This comprehensive guide will walk you through everything you need to know about installing WordPress themes, covering multiple methods, post-installation steps, and essential best practices. By the end of this tutorial, you’ll be able to confidently install any WordPress theme and begin customizing your site to perfection.
Understanding WordPress Themes Before You Begin
Before diving into the installation process, it’s helpful to understand what a WordPress theme is and why your choice matters. A theme is a collection of templates, stylesheets, and code that dictates your website’s visual presentation and often adds specific functionalities. It controls your layout, colors, fonts, headers, footers, and how your content is displayed.
Free vs. Premium Themes
- Free Themes: Available directly from the WordPress.org theme directory. They are a great starting point, often well-coded, and regularly reviewed. However, they might offer limited features and support.
- Premium Themes: Purchased from marketplaces (like CodeMMO) or independent developers. They typically come with extensive features, dedicated support, regular updates, and advanced customization options. They are an investment but can provide greater flexibility and unique designs.
What to Look for in a Good Theme
- Responsiveness: Ensures your site looks good and functions well on all devices (desktops, tablets, phones).
- Speed and Performance: A lightweight, optimized theme contributes to faster loading times, which is crucial for user experience and SEO.
- Regular Updates: Indicates the developer is actively maintaining the theme, ensuring compatibility with new WordPress versions and security fixes.
- Good Reviews and Support: Positive feedback and responsive support can save you headaches down the line.
- Features and Compatibility: Does it have the features you need? Is it compatible with essential plugins (e.g., WooCommerce, page builders)?
Crucial Pre-Installation Step: Back Up Your Site!
Before making any significant changes to your WordPress site, including theme installation, always create a full backup. This ensures that if anything goes wrong, you can easily restore your site to its previous state. Many hosting providers offer backup services, or you can use a WordPress backup plugin.
Method 1: Installing a Theme via the WordPress Dashboard (Theme Search)
This is the simplest and most common method for installing free themes available in the WordPress.org directory. It’s ideal for beginners.
Step-by-Step Instructions:
- Log in to Your WordPress Admin Area: Go to your website’s login page (e.g.,
yourdomain.com/wp-admin) and enter your credentials. - Navigate to Themes: In the WordPress admin dashboard, hover over “Appearance” in the left-hand menu and click on “Themes.”
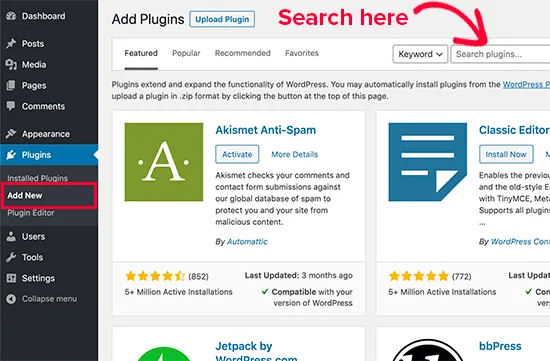
- Add New Theme: At the top of the Themes page, you’ll see a button labeled “Add New.” Click on it.
- Browse, Filter, or Search: You’ll now see a vast collection of free themes. You can:
- Browse the “Featured,” “Popular,” and “Latest” sections.
- Use the “Feature Filter” to narrow down themes by layout, features, and subject.
- Use the search bar on the right to look for specific themes by name or keyword.
- Preview, Install, and Activate:
- Hover over a theme to see options for “Details & Preview,” “Install,” or “Preview.”
- Click “Preview” to see how the theme would look on your site with your existing content (a live preview).
- Once you’re happy, click “Install.” WordPress will download and install the theme for you.
- After installation, the “Install” button will change to “Activate.” Click “Activate” to make the theme live on your site.
When to use this method: When you’re looking for a free theme and want to explore options directly from your WordPress dashboard without manual file handling.
Method 2: Installing a Theme via the WordPress Dashboard (Upload .zip File)
This method is typically used for premium themes or custom themes that you’ve purchased or downloaded from a source outside of the WordPress.org directory. These themes come as a compressed `.zip` file.
Step-by-Step Instructions:
- Download Your Theme .zip File: First, download the theme file from where you purchased or obtained it. Ensure it’s the installable theme file, not a larger package containing documentation or other assets. It should be a single `.zip` file.
- Log in to Your WordPress Admin Area: Access your WordPress dashboard.
- Navigate to Themes: Go to “Appearance” > “Themes.”
- Add New Theme: Click on the “Add New” button at the top of the Themes page.
- Upload Theme: Instead of searching, click on the “Upload Theme” button, which is usually found at the top of the page.
- Choose File and Install:
- Click “Choose File” and select the theme’s `.zip` file from your computer.
- Click “Install Now.”
- Activate Your Theme: Once WordPress has successfully uploaded and unpacked the theme, you’ll see a success message. Click “Activate” to make the new theme live on your website.
When to use this method: For premium themes, custom themes, or any theme obtained as a `.zip` file from a third-party marketplace or developer.
Method 3: Installing a Theme via FTP (File Transfer Protocol)
While less common for beginners, installing a theme via FTP (File Transfer Protocol) is an essential method to know. It’s useful in situations where you encounter file size upload limits through the WordPress dashboard, have direct server access issues, or simply prefer managing files this way. This method requires a bit more technical comfort but provides direct control over your website files.
Prerequisites:
- FTP Client: A program like FileZilla (free and highly recommended) to connect to your server.
- FTP Credentials: Your hostname, username, and password, typically provided by your web host.
Step-by-Step Instructions:
- Download and Unzip the Theme File: Download your theme as a `.zip` file. Before uploading, you MUST unzip this file on your local computer. You will be uploading the unzipped theme folder, not the `.zip` file itself.
- Connect to Your Server via FTP:
- Open your FTP client (e.g., FileZilla).
- Enter your FTP hostname, username, password, and port (usually 21) in the quick connect bar or site manager.
- Click “Quickconnect” or “Connect.”
- Navigate to the Themes Directory: Once connected, you’ll see your website’s file structure. Navigate to the following path:
wp-content/themes/. This is where all your WordPress themes are stored. - Upload the Unzipped Theme Folder:
- On the left panel of your FTP client (your local computer files), find the unzipped theme folder you prepared in step 1.
- Drag this folder from your local site panel to the
wp-content/themes/directory on your remote site panel. - Wait for the upload to complete. This might take a few minutes, depending on the theme size and your internet speed.
- Activate the Theme in WordPress:
- Once the upload is finished, log in to your WordPress admin area.
- Go to “Appearance” > “Themes.”
- You should now see your newly uploaded theme listed among the available themes.
- Hover over the theme and click “Activate.”
When to use this method: When you encounter upload size limits in the WordPress dashboard, prefer direct file management, or are troubleshooting issues with the other methods. For more advanced WordPress management tips, explore our comprehensive WordPress guides.
After Installation: Activating and Customizing Your New Theme
Installing the theme is just the first step. Now comes the exciting part: making it your own!
Activation
Regardless of the installation method, the final step is always to activate the theme. Once activated, your website will immediately display the new theme’s design. It’s a good practice to open your website in a new browser tab or incognito window to see the changes live.
Basic Customization with the WordPress Customizer
Most themes can be extensively customized using the WordPress Customizer. In your dashboard, go to “Appearance” > “Customize.” This opens a live preview interface where you can often change:
- Site Identity (logo, site title, favicon)
- Colors (background, text, links)
- Typography (fonts, font sizes)
- Header and Footer Layouts
- Menu Locations
- Widgets
- Homepage Settings
- Additional CSS
Changes made in the Customizer are shown in real-time, allowing you to experiment before publishing. Remember to click “Publish” to save your changes.
Theme Options Panels
Many premium themes come with their own dedicated “Theme Options” or “Theme Panel” in the WordPress dashboard (often found directly under “Appearance” or as a separate menu item). These panels provide more advanced, theme-specific settings not available in the standard Customizer, such as demo importer, performance settings, layout controls, and integration options.
Installing Recommended Plugins
Some themes require or recommend specific plugins for full functionality (e.g., page builders, sliders, custom post types). If your new theme recommends plugins, you’ll usually see a notice at the top of your dashboard after activation, guiding you through the installation process.
The Importance of Child Themes
When you customize a theme, especially by adding custom code or making significant changes, it’s crucial to use a child theme. A child theme inherits all the functionality and styling of a parent theme but allows you to make modifications without altering the original parent theme files.
Why use a child theme?
- Updates: If you modify the parent theme directly, all your changes will be overwritten the next time the parent theme is updated. A child theme protects your customizations during updates.
- Safety: If you make a mistake in your child theme, it’s easier to revert or fix without breaking the entire site.
Most premium themes come with a child theme included in the download package, or you can create one manually. Always activate the child theme, not the parent theme, after installation if you plan to make customizations.
Troubleshooting Common Theme Installation Issues
While WordPress theme installation is generally straightforward, you might occasionally encounter issues. Here are some common problems and their solutions:
- “Missing Style Sheet” Error: This is a very common error when uploading a theme via the dashboard. It usually means you’ve uploaded the entire theme package (which might contain documentation, licensing, and other files) instead of just the installable theme `.zip` file. Unzip the downloaded package on your computer, find the actual theme folder (it usually has the theme’s name and contains files like
style.cssandindex.php), re-zip ONLY that folder, and then upload the new `.zip` file. - Upload File Size Limits: If you try to upload a theme and get an error about file size, your web host has a low upload limit. You can try:
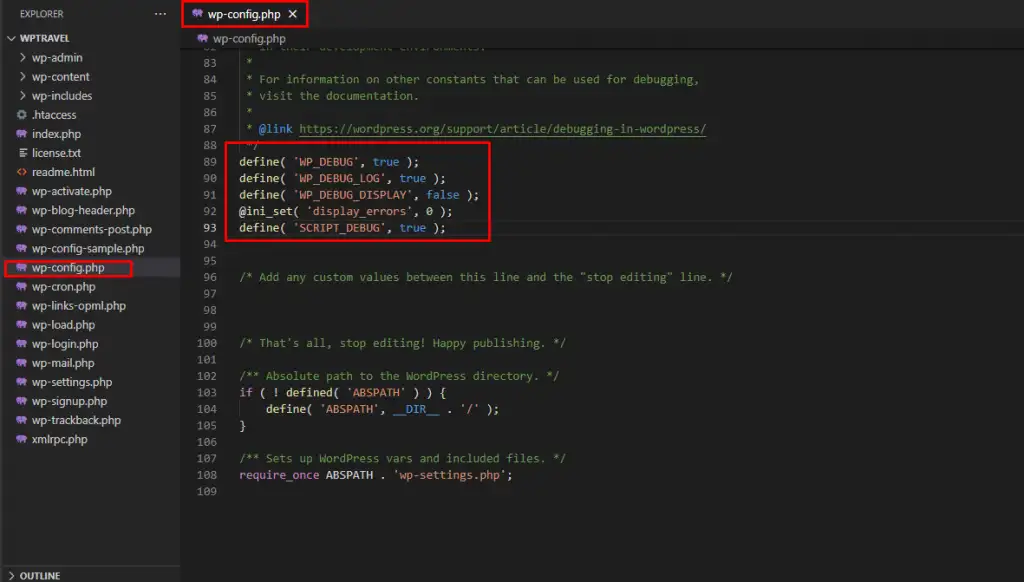
- Increasing the limit (contact your host or modify
php.ini,.htaccess, orwp-config.phpif you know how). - Using the FTP installation method (Method 3), which bypasses PHP upload limits.
- Increasing the limit (contact your host or modify
- Theme Compatibility Issues: Sometimes, a theme might not work well with your current WordPress version or other plugins. Check the theme’s documentation or support forums. Deactivating conflicting plugins or updating WordPress might resolve the issue.
- White Screen of Death (WSOD): If activating a theme results in a blank white screen, it often indicates a critical PHP error. Try deactivating the theme via FTP (rename its folder in
wp-content/themes/) and check your server error logs.
Best Practices for Choosing and Managing WordPress Themes
To ensure a smooth and successful WordPress journey, keep these best practices in mind:
- Source Reputable Themes: Always download themes from trusted sources like the official WordPress.org directory, established marketplaces, or reputable developers. This minimizes security risks and ensures quality. For high-quality, performance-optimized WordPress themes, visit our product category.
- Read Reviews and Check for Updates: Before committing to a theme, read user reviews and check the theme’s last update date. An actively maintained theme is crucial for security and compatibility.
- Prioritize Speed and Responsiveness: A fast, mobile-friendly website is non-negotiable for user experience and SEO. Choose themes optimized for performance.
- Consider SEO-Friendliness: While content is king, a well-coded, SEO-friendly theme provides a strong foundation for your site to rank well in search engines.
- Keep Themes Updated: Always update your themes to their latest versions. Updates often include security patches, bug fixes, and new features. Remember to use a child theme if you’ve made customizations!
- Remove Unused Themes: Deactivate and delete any themes you are not using. While inactive themes don’t affect site performance, they can still pose security risks if outdated.
Conclusion
Installing a WordPress theme is a fundamental skill that empowers you to control the look and feel of your website. Whether you choose the simplicity of the dashboard search, the directness of a `.zip` file upload, or the control of an FTP transfer, understanding these methods is key to successfully personalizing your WordPress site. Remember to always back up your site, use child themes for customizations, and select themes from reputable sources to ensure a secure, high-performing, and visually appealing online presence. Now go forth and create something beautiful!
Related articles:
-

Unlock Any Site’s Secret: WordPress Theme Detector
-

Ultimate WordPress Hosting Guide: Speed & Security
-

Install WordPress: Your Complete Step-by-Step Guide
-

How to Rename WordPress Theme Folder (Without Errors)
-
Fixing YouTube Video Display Errors in WordPress: A Comprehensive Troubleshooting Guide
-

How to Extract a .wpress File: Your Comprehensive Guide to Unpacking WordPress Backups
-

How to Handle Common Elementor Errors: Your Ultimate Troubleshooting Guide
-

How to Install Flatsome Theme on WordPress: A Complete Step-by-Step Guide
-

How to Enable Debug Mode in WordPress: Your Essential Guide to Troubleshooting Errors
-

How to Create a Child Theme for Any WordPress Theme: The Definitive Guide
-

The Ultimate Guide to Installing WordPress Plugins: Step-by-Step for Every User
-

How to Find, Create, and Master Your WordPress .htaccess File