Install WordPress: Your Complete Step-by-Step Guide
Embarking on the journey to create your own website is an exciting endeavor, and choosing WordPress as your platform is a brilliant first step. Powering over 40% of all websites on the internet, WordPress offers unparalleled flexibility, a vast ecosystem of themes and plugins, and an intuitive interface that makes web development accessible to everyone, from complete beginners to seasoned professionals.
While WordPress itself is user-friendly, the initial installation process can sometimes seem daunting. This comprehensive guide from CodeMMO is designed to demystify that process, providing you with clear, step-by-step instructions for installing WordPress using various methods. Whether you prefer the simplicity of a one-click installer, the control of a manual setup, or the flexibility of a local development environment, we’ve got you covered. By the end of this guide, you’ll have a fully functional WordPress site ready for your content.
Before You Begin: The Essential Pre-Installation Checklist
Regardless of the installation method you choose, a few fundamental components are necessary to get your WordPress site up and running. Think of this as preparing your workspace before starting a big project.
1. A Domain Name
Your domain name (e.g., yourwebsite.com) is your website’s unique address on the internet. It’s how people will find you. If you don’t have one yet, you’ll need to register it through a domain registrar.
2. Web Hosting
Web hosting is the service that makes your website accessible on the internet. It’s essentially the physical location where your website’s files and database are stored. Most hosting providers offer specific WordPress hosting plans, which are often optimized for performance and security. For this guide, we’ll assume you have a hosting plan that supports PHP (version 7.4 or greater) and MySQL (version 5.7 or greater) or MariaDB (version 10.2 or greater), which are the core requirements for WordPress.
3. An FTP Client (For Manual Installation)
If you opt for the manual installation method, you’ll need an FTP (File Transfer Protocol) client like FileZilla. This software allows you to connect to your web host’s server and upload your WordPress files. Your hosting provider will typically supply you with the necessary FTP credentials (hostname, username, password).
4. A Text Editor (For Manual Installation)
Again, primarily for manual installations, a plain text editor such as Notepad++ (Windows), VS Code, Sublime Text, or even the basic Notepad will be useful for editing configuration files.
5. Patience and a Cup of Coffee!
While we aim to make this process as smooth as possible, sometimes minor hiccups occur. A calm approach and the willingness to follow instructions carefully will ensure a successful installation.
Method 1: The Easiest Way – One-Click WordPress Installers (Recommended for Beginners)
Most reputable web hosting providers offer one-click WordPress installation services, usually through their control panel (cPanel is the most common). These installers, such as Softaculous, Fantastico, or Mojo Marketplace, automate much of the manual process, making it incredibly simple for beginners.
Step-by-Step: Using a cPanel One-Click Installer (e.g., Softaculous)
1. Log in to Your Hosting Account’s cPanel
Your hosting provider will give you a link to your cPanel login page, along with your username and password. Once logged in, you’ll see a dashboard with various icons and tools.
2. Find the WordPress Auto-Installer
Scroll down to the “Software” or “AutoInstallers” section. You’ll typically find an icon labeled “WordPress,” “Softaculous Apps Installer,” “Fantastico,” or something similar. Click on it.
3. Initiate the Installation Process
The installer will open. Look for a button that says “Install Now” or “Install.” Click it to begin.
4. Configure Your WordPress Installation Settings
You’ll be presented with a form to fill out. Here’s a breakdown of the important fields:
- Choose Installation URL:
- Choose Protocol: Select `https://` if your site has an SSL certificate (highly recommended for security and SEO). If not, start with `http://` and you can add SSL later.
- Choose Domain: Select the domain name where you want to install WordPress from the dropdown.
- In Directory: This is crucial. If you want WordPress installed directly on your main domain (e.g., `yourdomain.com`), leave this field BLANK. If you want it in a subfolder (e.g., `yourdomain.com/blog`), type the subfolder name here.
- Site Settings:
- Site Name: The title of your website (e.g., “My Awesome Blog”). You can change this later.
- Site Description: A short tagline for your site. Also changeable later.
- Enable Multi-site: Leave unchecked unless you specifically know you need a WordPress multisite network.
- Admin Account:
- Admin Username: Do NOT use “admin.” Choose a unique, secure username.
- Admin Password: Create a strong, complex password. Use a mix of uppercase and lowercase letters, numbers, and symbols. Store it securely!
- Admin Email: Enter a valid email address. This is where WordPress will send notifications and password reset links.
- Choose Language: Select your preferred language for the WordPress dashboard.
- Select Plugins/Themes (Optional): Some installers offer to install basic plugins or themes. You can usually skip this, as you’ll want to choose them yourself later.
- Email Installation Details: Enter an email address to receive the installation details after completion.
5. Complete the Installation
Review all your settings, then click the “Install” button at the bottom of the page. The installer will now download WordPress, create the database, and configure everything for you. This usually takes just a few minutes.
Once finished, you’ll receive a confirmation message with links to your new WordPress site and your WordPress admin login page (e.g., `yourdomain.com/wp-admin`). Congratulations, your WordPress site is live!
Method 2: The Classic Approach – Manual WordPress Installation (For More Control)
Manual installation gives you complete control over the process and a deeper understanding of how WordPress works under the hood. While it involves a few more steps, it’s not overly complex and is a valuable skill to learn.
Step 1: Download the Latest WordPress Version
Always start by downloading the latest stable version of WordPress from the official website. This ensures you have the most secure and feature-rich software.
- Go to wordpress.org/download/.
- Click the “Download WordPress [version number]” button to download the `.zip` file to your computer.
- Once downloaded, extract the contents of the `.zip` file to a folder on your computer. You’ll see a folder named `wordpress` containing all the core WordPress files.
Step 2: Upload WordPress Files to Your Web Host
Now, you need to transfer these files from your computer to your web hosting server using an FTP client.
- Connect via FTP: Open your FTP client (e.g., FileZilla). Enter your host’s FTP hostname (often your domain name or `ftp.yourdomain.com`), your FTP username, and password. Click “Quickconnect.”
- Navigate to Your Root Directory: Once connected, you’ll see your local files on one side and server files on the other. On the server side, navigate to your public web directory. This is usually named `public_html`, `www`, or `htdocs`. If you want WordPress on a subdomain or in a subfolder, navigate to that specific directory.
- Upload Files: On your local side, open the extracted `wordpress` folder. Select ALL the files and folders *inside* this `wordpress` folder (not the folder itself) and drag them to your `public_html` (or target) directory on the server side. This process can take some time, depending on your internet speed and the number of files.
Step 3: Create a MySQL Database and User
WordPress needs a database to store all your website’s content, such as posts, pages, comments, and settings. You’ll create this via your cPanel.
- Log in to cPanel: Access your cPanel as you did for the one-click installer.
- Open MySQL Databases: In the “Databases” section, find and click “MySQL Databases.”
- Create a New Database: Under “Create New Database,” enter a unique name for your database (e.g., `wp_mysite`). Click “Create Database.” Make sure to note down the full database name (it will often have a prefix added by your host, e.g., `yourusername_wp_mysite`).
- Create a New User: Scroll down to “MySQL Users.” Under “Add New User,” enter a strong username (e.g., `wpuser_mysite`) and generate an even stronger password. Click “Create User.” Note down this username and password.
- Add User to Database: Scroll further down to “Add User To Database.” Select the user you just created from the “User” dropdown and the database you created from the “Database” dropdown. Click “Add.”
- Grant Privileges: On the next screen, select “ALL PRIVILEGES” to ensure the user has full access to the database. Click “Make Changes.”
You now have a database, a user, and that user is assigned to the database with all necessary permissions. Keep the database name, username, and password handy, as you’ll need them in the next step.
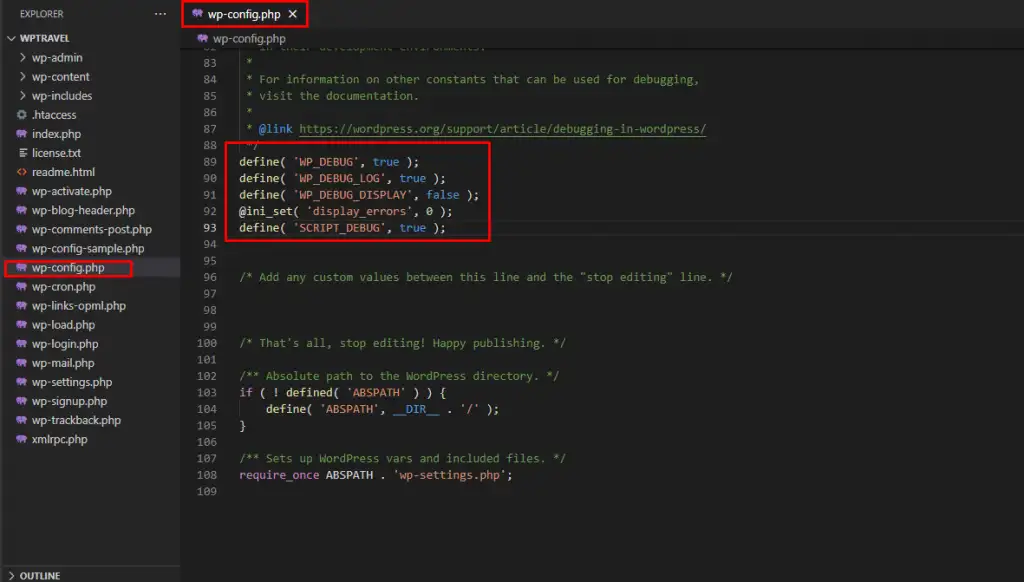
Step 4: Configure the `wp-config.php` File
The `wp-config.php` file is WordPress’s main configuration file. You’ll tell WordPress how to connect to the database here.
- Locate `wp-config-sample.php`: In the `public_html` directory where you uploaded your WordPress files, find the file named `wp-config-sample.php`.
- Rename the File: Rename `wp-config-sample.php` to `wp-config.php`.
- Edit `wp-config.php`: Download this file to your computer, open it with your text editor, and locate the following lines:
define( 'DB_NAME', 'database_name_here' ); define( 'DB_USER', 'username_here' ); define( 'DB_PASSWORD', 'password_here' ); define( 'DB_HOST', 'localhost' ); - Enter Your Database Details:
- Replace `’database_name_here’` with your full database name (e.g., `yourusername_wp_mysite`).
- Replace `’username_here’` with your database username (e.g., `yourusername_wpuser_mysite`).
- Replace `’password_here’` with the strong password you created for the database user.
- Leave `’DB_HOST’` as `’localhost’` unless your hosting provider specifies a different database host (which is rare).
- Add Unique Security Keys: Scroll down a bit further in `wp-config.php` to find the section for “Authentication Unique Keys and Salts.” These are essential for improving your site’s security.
- Go to https://api.wordpress.org/secret-key/1.1/salt/ to generate a unique set of keys.
- Copy the entire block of generated code.
- Paste it over the existing placeholder lines in your `wp-config.php` file.
- Save and Re-upload: Save the `wp-config.php` file. Then, use your FTP client to upload the modified `wp-config.php` file back to your `public_html` directory, overwriting the existing (sample) file.
Step 5: Run the WordPress Installation Script
Almost there! Now you just need to run the final installation script through your web browser.
- Open your web browser and navigate to your domain name (e.g., `yourdomain.com`). If you installed WordPress in a subfolder, go to `yourdomain.com/subfolder/`.
- WordPress will detect that it hasn’t been installed yet and will redirect you to the installation script (e.g., `yourdomain.com/wp-admin/install.php`).
- Select Language: Choose your preferred language and click “Continue.”
- Welcome Screen: You’ll see a welcome screen asking for basic information.
- Enter Site Details:
- Site Title: The name of your website.
- Username: Create a unique administrator username (again, avoid “admin”).
- Password: Generate a strong, secure password and make sure to store it safely.
- Your Email: Enter a valid email address for notifications and password resets.
- Search Engine Visibility: Decide if you want search engines to index your site immediately. For a new site under development, you might check “Discourage search engines from indexing this site.” Remember to uncheck this later when your site is ready!
- Click “Install WordPress”: After filling out all the details, click the “Install WordPress” button.
If everything is configured correctly, WordPress will complete the installation, and you’ll see a “Success!” message. You can now click “Log In” and enter your chosen username and password to access your WordPress dashboard.
Method 3: Local WordPress Installation for Development (Offline Work)
Installing WordPress locally on your computer is perfect for development, testing new themes or plugins, or practicing without affecting a live website. You don’t need a domain or web hosting for this method.
What You’ll Need: A Local Server Environment
To run WordPress locally, your computer needs to act as a web server. Software packages like XAMPP, WAMP (for Windows), or MAMP (for macOS) bundle Apache (web server), MySQL (database), and PHP (WordPress’s scripting language) into one easy-to-install package.
We’ll use XAMPP as an example, but the steps are similar for WAMP or MAMP.
Step 1: Download and Install XAMPP
- Go to apachefriends.org/download.html.
- Download the appropriate XAMPP installer for your operating system.
- Run the installer. Follow the on-screen instructions, accepting the default settings is usually fine.
- Once installed, open the XAMPP Control Panel. Start the Apache and MySQL modules by clicking their “Start” buttons. Their status should turn green.
Step 2: Download WordPress
Just like with manual installation, download the latest WordPress `.zip` file from wordpress.org/download/ and extract its contents.
Step 3: Place WordPress Files in XAMPP’s `htdocs`
- Navigate to your XAMPP installation directory. On Windows, this is typically `C:xampp`.
- Inside the `xampp` folder, find the `htdocs` folder. This is where all your local websites will reside.
- Create a new folder inside `htdocs` for your WordPress site (e.g., `mysite`).
- Copy all the extracted WordPress files and folders (from inside the `wordpress` folder you downloaded) into your newly created `mysite` folder (e.g., `C:xampphtdocsmysite`).
Step 4: Create a MySQL Database
- Open your web browser and go to `http://localhost/phpmyadmin`. This is XAMPP’s interface for managing MySQL databases.
- In phpMyAdmin, click “New” on the left sidebar to create a new database.
- Enter a name for your database (e.g., `mysitedb`). Click “Create.”
You don’t need to create a separate user for local installations with XAMPP; the default `root` user with an empty password is typically used for `localhost`.
Step 5: Configure `wp-config.php` for Local Setup
- Navigate to your WordPress installation folder (e.g., `C:xampphtdocsmysite`).
- Rename `wp-config-sample.php` to `wp-config.php`.
- Open `wp-config.php` in your text editor and modify the database details:
define( 'DB_NAME', 'mysitedb' ); // Your database name define( 'DB_USER', 'root' ); // Default XAMPP MySQL username define( 'DB_PASSWORD', '' ); // Default XAMPP MySQL password (empty) define( 'DB_HOST', 'localhost' ); - Generate and paste your unique security keys as described in the manual installation section.
- Save the `wp-config.php` file.
Step 6: Run the WordPress Installation Script (Local)
- Open your web browser and go to `http://localhost/mysite/wp-admin/install.php` (replace `mysite` with your folder name).
- The WordPress installation screen will appear. Fill in your site title, username, password, and email, just as you would for a live site.
- Click “Install WordPress.”
Upon successful installation, you’ll be able to log into your local WordPress dashboard by visiting `http://localhost/mysite/wp-admin`. You now have a fully functional WordPress environment for offline development!
Post-Installation Essentials: Securing & Optimizing Your New WordPress Site
Once WordPress is installed, whether on a live server or locally, there are a few crucial steps to take before you start building your content.
1. Update Permalinks
Permalinks are the permanent URLs to your individual blog posts and pages. By default, WordPress uses a plain structure with numbers, which isn’t very SEO-friendly.
- From your WordPress dashboard, go to Settings > Permalinks.
- Select “Post name” (e.g., `yourdomain.com/sample-post/`). This is the most SEO-friendly option.
- Click “Save Changes.”
2. Delete Default Content
WordPress comes with a default “Hello World!” post, a sample page, and a sample comment. It’s good practice to delete these:
- Go to Posts > All Posts, hover over “Hello World!” and click “Trash.”
- Go to Pages > All Pages, hover over “Sample Page” and click “Trash.”
- Go to Comments, hover over the sample comment and click “Trash.”
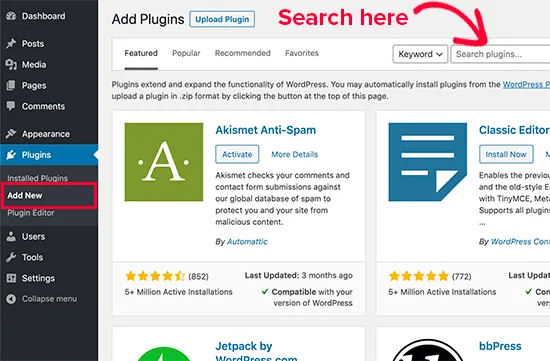
3. Install Essential Plugins
Plugins extend WordPress’s functionality. Here are some categories of plugins you’ll almost certainly need:
- Security: Wordfence, Sucuri.
- SEO: Rank Math, Yoast SEO.
- Caching/Performance: WP Rocket, LiteSpeed Cache, WP Super Cache.
- Backup: UpdraftPlus, Duplicator.
- Contact Forms: WPForms, Contact Form 7.
To install a plugin, go to Plugins > Add New, search for the plugin, click “Install Now,” and then “Activate.”
4. Choose a Theme
Your theme dictates the visual appearance of your website.
- Go to Appearance > Themes.
- Click “Add New” to browse thousands of free themes from the WordPress.org directory.
- You can also upload premium themes you’ve purchased.
- Install and Activate your chosen theme. Then, use Appearance > Customize to personalize it.
5. Configure Basic Settings
Review and adjust other general settings under Settings:
- General: Site Title, Tagline, WordPress Address (URL), Site Address (URL), Admin Email, Timezone.
- Writing: Default Post Category.
- Reading: Your homepage display settings (e.g., a static page or your latest posts).
- Discussion: Comment settings.
- Media: Image sizes.
6. Set Up Backups
This is critical. Always have a backup solution in place. Many hosting providers offer automatic backups, but a dedicated WordPress backup plugin provides more control and flexibility.
Troubleshooting Common WordPress Installation Issues
Even with careful steps, you might encounter issues. Here are a few common ones:
- Error Establishing a Database Connection: This is usually caused by incorrect database name, username, or password in your `wp-config.php` file, or incorrect `DB_HOST`. Double-check these credentials against what you created in cPanel.
- White Screen of Death (WSOD): While less common on a fresh install, if you see a blank white page, it often points to a PHP error or memory limit issue. Try increasing PHP memory limit (often in `wp-config.php` or `php.ini`).
- 404 Errors on Posts/Pages (After Install): This typically means your permalinks are not configured correctly or your server’s rewrite module (mod_rewrite for Apache) isn’t enabled. Try saving your permalinks twice, and contact your host if the issue persists.
- Permissions Errors: If you can’t upload images or install plugins, your file permissions might be incorrect. Use your FTP client to set directory permissions to 755 and file permissions to 644. Be cautious when changing permissions.
Why Choose CodeMMO for Your WordPress Journey?
Installing WordPress is just the first step. To truly unlock its potential and ensure your website thrives, you need robust support, optimized solutions, and expert guidance. CodeMMO understands the intricacies of WordPress and offers tailored services to elevate your site’s performance, security, and scalability. From blazing-fast hosting environments optimized specifically for WordPress to comprehensive managed services, we provide the foundation for your online success.
Once WordPress is installed, you might be looking for powerful tools and services to enhance your site. CodeMMO’s WordPress solutions offer everything you need, from managed hosting to expert development assistance, ensuring your site is fast, secure, and always performing at its best.
Conclusion
You’ve successfully navigated the process of installing WordPress! Whether you chose the convenience of a one-click installer, the control of a manual setup, or the flexibility of a local environment, you now have a powerful foundation for your website. WordPress’s versatility means you can build almost anything imaginable, from a simple blog to a complex e-commerce store or a robust business site.
Remember that the journey of building a website is continuous. Keep learning, exploring new features, and always prioritize security and performance. For more in-depth tutorials and insights into web development, explore our comprehensive guide section, which is packed with valuable resources to help you master WordPress and beyond. Happy building!
- How to Handle Common Elementor Errors: Your Ultimate Troubleshooting Guide
- How to Enable Debug Mode in WordPress: Your Essential Guide to Troubleshooting Errors
- How to Create a Child Theme for Any WordPress Theme: The Definitive Guide
- How to Rename WordPress Theme Folder (Without Errors)
- The Ultimate Guide to Installing WordPress Plugins: Step-by-Step for Every User
Related articles:
-

Unlock Any Site’s Secret: WordPress Theme Detector
-

Ultimate WordPress Hosting Guide: Speed & Security
-

How to Rename WordPress Theme Folder (Without Errors)
-

Fixing YouTube Video Display Errors in WordPress: A Comprehensive Troubleshooting Guide
-

How to Extract a .wpress File: Your Comprehensive Guide to Unpacking WordPress Backups
-

How to Handle Common Elementor Errors: Your Ultimate Troubleshooting Guide
-

How to Install Flatsome Theme on WordPress: A Complete Step-by-Step Guide
-

How to Enable Debug Mode in WordPress: Your Essential Guide to Troubleshooting Errors
-

How to Create a Child Theme for Any WordPress Theme: The Definitive Guide
-
Guide to Installing WordPress Themes: A Comprehensive Step-by-Step Tutorial
-

The Ultimate Guide to Installing WordPress Plugins: Step-by-Step for Every User
-

How to Find, Create, and Master Your WordPress .htaccess File