How to Extract a .wpress File: Your Comprehensive Guide to Unpacking WordPress Backups
In the world of WordPress, maintaining a robust backup strategy is paramount. One of the most popular and efficient ways to back up your entire WordPress site is by using the All-in-One WP Migration plugin, which generates a convenient, self-contained .wpress file. This single file encapsulates your entire database, themes, plugins, and media uploads, making site migration and restoration remarkably straightforward.
However, there are times when you don’t want to import the entire site. Perhaps you need to access a specific image, a particular plugin file, or just your database without setting up a full WordPress installation. This is where understanding how to extract a .wpress file becomes invaluable. Whether you’re a developer, a site administrator, or just someone trying to recover a lost piece of content, knowing your options for unpacking these archives can save you significant time and effort.
This comprehensive guide will walk you through multiple methods to extract a .wpress file, catering to different technical skill levels and use cases. From the simplest method of direct import into a WordPress site to more advanced command-line techniques, we’ll cover everything you need to know to get your data back.
Understanding the .wpress File Format
Before diving into extraction methods, it’s helpful to understand what a .wpress file truly is. Developed by ServMask for their All-in-One WP Migration plugin, this proprietary file format is essentially a highly compressed archive. Unlike standard ZIP or TAR archives, a .wpress file is specifically structured to contain all components of a WordPress installation, optimized for re-importation by the plugin.
Its primary benefit lies in its self-contained nature. When you create a backup, everything your WordPress site needs—the database (usually an SQL dump), the wp-content folder (with themes, plugins, and uploads), and core WordPress files—is bundled into one neat package. This design streamlines the process of moving a WordPress site from one host to another or restoring it after a catastrophic event. While incredibly convenient for the plugin’s intended purpose, its proprietary format means you can’t simply open it with a standard archive tool like WinRAR or 7-Zip, necessitating specific extraction techniques.
Method 1: The Easiest Way – Importing with All-in-One WP Migration
For most users, the most straightforward and recommended way to “extract” a .wpress file is by using the very plugin that created it: All-in-One WP Migration. This method is ideal if your goal is to restore a backup to an existing WordPress installation or to migrate a site to a new (even empty) WordPress setup. It handles all the database serialization and file placement automatically, minimizing potential errors.
Step-by-Step Guide to Importing a .wpress File:
- Prepare Your WordPress Site:
If you’re restoring a backup to an existing site, ensure you’ve made a fresh backup of the current site first, just in case something goes wrong. If you’re migrating to a new host, you’ll need a fresh WordPress installation on your target server. It doesn’t need any content; just the core WordPress files.
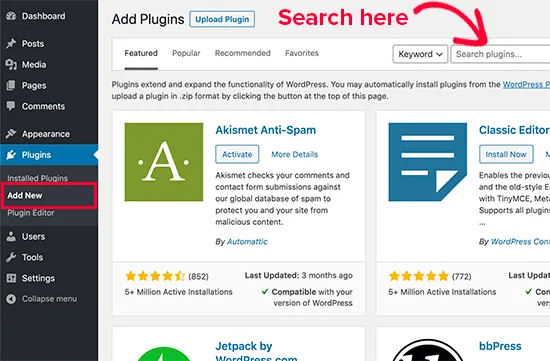
- Install the All-in-One WP Migration Plugin:
Log in to your WordPress admin dashboard (on the site where you want to import the
.wpressfile). Go to Plugins > Add New. Search for “All-in-One WP Migration,” install it, and then activate it. - Navigate to the Import Section:
Once activated, you’ll see a new item in your WordPress dashboard sidebar labeled “All-in-One WP Migration.” Click on it, then select Import from the submenu.
- Upload Your .wpress File:
You’ll see an “Import from” section. Click on the “FILE” option. This will open a file browser. Locate your
.wpressfile on your computer and select it.Alternatively, you can drag and drop your
.wpressfile directly into the designated upload area in the plugin interface. - Wait for the Upload and Processing:
The plugin will now upload and process your
.wpressfile. This can take some time, especially for larger files, depending on your internet speed and server resources. You’ll see a progress bar indicating the status.Important Note on File Size Limits: The free version of the All-in-One WP Migration plugin has an upload size limit, which can vary depending on your host’s PHP configuration (
upload_max_filesizeandpost_max_size). If your.wpressfile exceeds this limit, you might encounter an error. You can either increase these PHP limits (if you have server access), consider using the premium version of the plugin, or explore the manual extraction methods discussed below. - Proceed with the Import:
Once the upload is complete, the plugin will display a warning message stating that importing will overwrite your existing website, including the database, media, plugins, and themes. This is why a prior backup of the destination site is crucial if it contains valuable data.
If you’re confident, click the PROCEED button to continue.
- Finalize the Import:
The plugin will then complete the import process. Once done, it will prompt you to save your permalink structure twice. Go to Settings > Permalinks in your WordPress dashboard and simply click Save Changes (without making any modifications) two times. This ensures all your links work correctly after the migration.
- Verify Your Site:
Finally, log out and log back into your WordPress admin with the credentials from the original site (the one the
.wpressfile was created from). Browse your site to ensure everything has been imported correctly.The All-in-One WP Migration plugin is a popular choice for this, and many other powerful solutions are available to enhance your WordPress site.
This method is by far the most reliable for full site restoration or migration as it leverages the plugin’s internal logic for handling database serialization and file paths correctly.
Method 2: Extracting .wpress Files Manually with a Desktop Extractor
What if you don’t have a WordPress site to import into, or you only need to retrieve a few specific files (like an image, a theme file, or the database dump) without performing a full restoration? In such cases, a dedicated desktop extractor tool comes in handy. One popular option is the All-in-One WP Migration Extractor (AWEP) by D&D Studio.
This method allows you to unpack the .wpress file on your local computer, giving you direct access to its contents as regular files and folders.
Step-by-Step Guide to Using AWEP (or Similar Desktop Extractor):
- Download a .wpress Extractor Tool:
Search online for “All-in-One WP Migration Extractor” or “AWEP.” You’ll typically find open-source projects or standalone applications designed for this purpose. Download the tool that is compatible with your operating system (Windows, macOS, Linux). Ensure you download it from a trustworthy source, like GitHub or a reputable software repository.
Disclaimer: Always exercise caution when downloading third-party software. Verify the source and check for user reviews or security scans if possible.
- Install and Launch the Extractor:
Once downloaded, install the software (if it’s an installer) or simply extract the archive and run the executable file (if it’s a portable application).
- Open Your .wpress File:
In the extractor application, you’ll typically find an “Open” or “Select File” button. Click this and navigate to the location of your
.wpressfile on your computer. Select the file and open it. - Choose an Output Directory:
The extractor will usually prompt you to choose a destination folder where the extracted contents will be saved. Select an empty folder or create a new one to avoid clutter. Ensure you have enough disk space for the extracted files, as they will be larger than the compressed
.wpressfile. - Start the Extraction Process:
Click the “Extract” or “Start” button within the tool. The application will begin unpacking the
.wpressfile. This process can take several minutes, depending on the size of your backup and your computer’s performance. - Review the Extracted Contents:
Once the extraction is complete, navigate to your chosen output directory. You should find a structured set of folders and files, typically including:
wp-content/(containing themes, plugins, uploads, etc.)database.sql(your WordPress database dump)- Other core WordPress files and folders.
You can now browse these files, open the
database.sqlfile with a text editor or database management tool, or copy specific assets as needed.
This method offers excellent flexibility when you need granular access to your backup’s contents without the overhead of a full WordPress installation or import process.
Method 3: Advanced Extraction Using a PHP Script (Command Line)
For those comfortable with command-line interfaces and server environments, extracting a .wpress file using a PHP script offers a powerful and efficient alternative, especially for very large files or when you need to automate the extraction process. This method is often preferred by developers or system administrators who have SSH access to their servers.
The All-in-One WP Migration plugin itself uses PHP to handle the file processing, so it’s logical that a custom PHP script can mimic this functionality to unpack the .wpress archive.
Prerequisites:
- SSH Access: You need Secure Shell (SSH) access to a server or local development environment.
- PHP CLI: PHP must be installed and accessible via the command line (
phpcommand should work). - The .wpress File: Your backup file needs to be accessible on the server.
- Extraction Script: You’ll need a specific PHP script designed to extract
.wpressfiles. These scripts are sometimes available on GitHub (e.g., from the All-in-One WP Migration repository or community-contributed tools).
Step-by-Step Guide to Using a PHP Extraction Script:
- Obtain the PHP Extraction Script:
Search for a reliable
.wpressextraction PHP script. A common script often involves using the same logic as found within the All-in-One WP Migration plugin itself. An example command might look like this (you might need to adapt the path to the actual plugin files if not using a dedicated standalone script):<?php require_once dirname( __FILE__ ) . '/wp-content/plugins/all-in-one-wp-migration/lib/chunk.php'; require_once dirname( __FILE__ ) . '/wp-content/plugins/all-in-one-wp-migration/lib/file_reader.php'; require_once dirname( __FILE__ ) . '/wp-content/plugins/all-in-one-wp-migration/lib/file_writer.php'; require_once dirname( __FILE__ ) . '/wp-content/plugins/all-in-one-wp-migration/lib/archive.php'; require_once dirname( __FILE__ ) . '/wp-content/plugins/all-in-one-wp-migration/lib/constants.php'; if ( ! isset( $argv[1] ) ) { die( "Usage: php extract.php <wpress_file> [output_dir]n" ); } $wpress_file = $argv[1]; $output_dir = isset( $argv[2] ) ? rtrim( $argv[2], '/' ) : __DIR__ . '/' . basename( $wpress_file, '.wpress' ); if ( ! file_exists( $wpress_file ) ) { die( "Error: .wpress file not found: $wpress_filen" ); } if ( ! is_dir( $output_dir ) ) { mkdir( $output_dir, 0777, true ); } echo "Extracting '{$wpress_file}' to '{$output_dir}'...n"; try { $archive = new Ai1wm_Archive(); $archive->open( $wpress_file ); $reader = new Ai1wm_File_Reader( $archive ); $writer = new Ai1wm_File_Writer( $output_dir ); while ( $reader->has_next_chunk() ) { $chunk = $reader->get_next_chunk(); $writer->write_chunk( $chunk ); } echo "Extraction complete!n"; } catch ( Exception $e ) { die( "Error during extraction: " . $e->getMessage() . "n" ); } ?>Save this code as, for example,
extract.php. Note that this script assumes the All-in-One WP Migration plugin’s library files are present. A more robust standalone script might bundle these functionalities. - Upload Files to Your Server:
Using an SFTP client (like FileZilla) or SSH, upload both your
.wpressfile and theextract.phpscript to a directory on your server. It’s often convenient to place them in the same directory, or at least ensure the script can correctly reference the.wpressfile. - Connect via SSH:
Open your terminal or command prompt and connect to your server via SSH:
ssh username@your-server-ip-or-domainNavigate to the directory where you uploaded your files:
cd /path/to/your/files - Execute the Extraction Script:
Run the PHP script, passing the name of your
.wpressfile as an argument:php extract.php your-backup-file.wpressYou can also specify an output directory:
php extract.php your-backup-file.wpress /path/to/output/folderThe script will start the extraction process, and you’ll typically see progress messages in your terminal.
- Verify Extracted Contents:
Once the script finishes, you can use the
lscommand (or navigate via SFTP) to inspect the newly created directory. You should find all your WordPress files and thedatabase.sqlfile.
This command-line approach is powerful for handling very large .wpress files that might time out or exceed memory limits when processed through a web interface. It also allows for greater control and integration into automated workflows.
Troubleshooting Common Issues During .wpress Extraction
While the methods above are generally reliable, you might encounter some hurdles. Here’s a rundown of common issues and how to tackle them:
- File Size Limits:
This is the most frequent issue when using the All-in-One WP Migration plugin. The free version has an upload limit, often around 256MB or 512MB, which can be further constrained by your server’s PHP settings (
upload_max_filesize,post_max_size,memory_limit). If your.wpressfile is larger, consider:- Increasing PHP limits in your
php.inior.htaccessfile (if your hosting allows). - Using the premium version of the All-in-One WP Migration plugin, which often bypasses these limits.
- Opting for Method 2 (desktop extractor) or Method 3 (PHP command line), as they are less susceptible to web server upload limits.
- Increasing PHP limits in your
- Corrupted .wpress File:
If the extraction fails consistently across different methods, your
.wpressfile might be corrupted. This can happen during backup creation, download, or transfer. Try to:- Generate a new backup from your source site if possible.
- Ensure the file was fully downloaded and has the correct size.
- Server Timeouts:
Large files or slow servers can lead to PHP script execution timeouts during the import process. This is often controlled by the
max_execution_timesetting inphp.ini. You can try to:- Increase
max_execution_time(e.g., to 300 or 600 seconds). - Use the desktop extractor or command-line method, which are not subject to web server execution limits.
- Increase
- Memory Exhaustion:
Processing large
.wpressfiles can consume a lot of server memory, leading to “Allowed memory size of X bytes exhausted” errors. Adjustingmemory_limitinphp.inito a higher value (e.g., 256M, 512M, or even -1 for unlimited, though this is not recommended for production) can help. - Permissions Errors:
If you’re extracting files to a server directory, ensure that the PHP process (or your SSH user) has the necessary write permissions to the target folder. Incorrect file or directory permissions can prevent the extractor from saving files.
- Database Serialization Issues:
When manually extracting the
database.sqlfile and importing it separately, be aware of serialization problems. WordPress often stores serialized data (e.g., widget settings, plugin options) where the length of strings is recorded. If you simply change URLs in the SQL file, these length values won’t update, leading to broken data. Always use a search-and-replace tool designed for serialized data (like “Better Search Replace” plugin after importing, or WP-CLI’ssearch-replacecommand) if you’re changing URLs post-extraction.
Best Practices for Managing Your WordPress Backups
Understanding how to extract a .wpress file is just one part of a robust backup strategy. To ensure your WordPress site remains secure and recoverable, adhere to these best practices:
- Automate Backups: Don’t rely on manual backups. Schedule regular, automated backups using plugins (like All-in-One WP Migration, UpdraftPlus, Duplicator) or your hosting provider’s services.
- Store Backups Off-site: Never store your only copy of a backup on the same server as your live website. Use cloud storage (Google Drive, Dropbox, Amazon S3), a separate server, or a local external drive for off-site redundancy.
- Test Your Backups Regularly: An untested backup is not a backup. Periodically perform a test restore of your
.wpressfile (or other backup formats) to a staging environment or local development setup to ensure it’s complete and functional. This validates your backup strategy. - Keep Multiple Backup Versions: Implement a rotation policy (e.g., daily for 7 days, weekly for 4 weeks, monthly for 3 months) to have different points in time to restore from. This protects against discovering corruption long after a backup was made.
- Understand Different Backup Methods: While
.wpressfiles are great for full site migration, consider database-only backups or file-only backups for quicker, more frequent incremental saves, depending on your needs. For more in-depth WordPress guides and tutorials, be sure to explore our extensive resource section. - Secure Your Backups: Protect your backup files from unauthorized access. If storing them in the cloud, ensure strong passwords and two-factor authentication. If locally, use encryption.
Conclusion: Choosing the Right Extraction Method for Your Needs
Extracting a .wpress file doesn’t have to be a daunting task. The method you choose largely depends on your specific goal and technical comfort level. For seamless site migration or full restoration, importing directly with the All-in-One WP Migration plugin is almost always the easiest and most reliable path.
However, when you need surgical access to individual files or the database outside of a WordPress environment, desktop extractor tools or command-line PHP scripts offer powerful alternatives. Remember to always prioritize backup integrity, test your recovery procedures, and follow best practices to safeguard your valuable WordPress data.
By mastering these extraction techniques, you gain greater control over your WordPress backups, empowering you to manage your sites with confidence and efficiency.
Related articles:
-

Unlock Any Site’s Secret: WordPress Theme Detector
-

Ultimate WordPress Hosting Guide: Speed & Security
-

Install WordPress: Your Complete Step-by-Step Guide
-

How to Rename WordPress Theme Folder (Without Errors)
-
Fixing YouTube Video Display Errors in WordPress: A Comprehensive Troubleshooting Guide
-

How to Handle Common Elementor Errors: Your Ultimate Troubleshooting Guide
-

How to Install Flatsome Theme on WordPress: A Complete Step-by-Step Guide
-

How to Enable Debug Mode in WordPress: Your Essential Guide to Troubleshooting Errors
-

How to Create a Child Theme for Any WordPress Theme: The Definitive Guide
-
Guide to Installing WordPress Themes: A Comprehensive Step-by-Step Tutorial
-

The Ultimate Guide to Installing WordPress Plugins: Step-by-Step for Every User
-

How to Find, Create, and Master Your WordPress .htaccess File