The Ultimate Guide to Installing WordPress Plugins: Step-by-Step for Every User
WordPress, at its core, is a robust and flexible content management system. However, its true power lies in its extensibility – the ability to add new features and functionalities through plugins. From enhancing SEO and boosting security to creating online stores and custom forms, plugins transform a basic WordPress installation into a highly customized, high-performance website tailored to your specific needs.
For many, the idea of “installing software” can sound daunting. But when it comes to WordPress plugins, the process is surprisingly straightforward, designed even for those with minimal technical expertise. This ultimate guide will walk you through every method of plugin installation, ensuring you have the confidence and knowledge to safely and effectively expand your website’s capabilities. Whether you’re a complete beginner or looking to refresh your knowledge on advanced methods, we’ve got you covered.
Why WordPress Plugins Are Indispensable for Your Website
Think of WordPress as a powerful engine. Plugins are the specialized components you add to that engine to make it perform specific tasks, from turbocharging its speed to adding a navigation system or even a luxury interior. Without plugins, WordPress would still be a fantastic blogging platform, but it wouldn’t be the versatile beast capable of running everything from personal blogs to Fortune 500 company websites.
Here’s why plugins are absolutely essential for almost any WordPress site:
- Extending Functionality: Need an e-commerce store? There’s a plugin for that (WooCommerce). Want to improve your search engine rankings? SEO plugins like Rank Math or Yoast are your allies. Looking to build complex contact forms? Form builders like WPForms or Contact Form 7 have you covered. Plugins allow you to add virtually any feature without writing a single line of code.
- Saving Time and Development Costs: Instead of hiring a developer to custom-code a feature, you can often find a ready-made plugin that does exactly what you need, often at a fraction of the cost or even for free. This dramatically speeds up development time and lowers expenses.
- Personalization and User Experience: Plugins allow you to tailor your website to your audience’s needs, offering better navigation, faster loading times, improved security, and engaging interactive elements, all contributing to a superior user experience.
- Security and Performance: Dedicated plugins can significantly enhance your site’s security, protecting it from malicious attacks, spam, and vulnerabilities. Others focus on optimizing performance by caching content, optimizing images, and minifying code, leading to faster load times.
Before You Begin: Essential Preparations
While installing plugins is generally safe, it’s crucial to take a few preparatory steps. These measures act as safety nets, protecting your site from potential issues and ensuring a smooth experience.
1. Backup Your WordPress Site (Crucial Step!)
This cannot be stressed enough: **Always back up your WordPress site before installing any new plugin, especially a major one or one from an unknown source.** Plugins introduce new code and database entries, and while reputable plugins are thoroughly tested, conflicts can sometimes arise, leading to site errors, or even the dreaded White Screen of Death (WSOD). A recent backup allows you to restore your site to its previous state if anything goes wrong.
Many hosting providers offer one-click backup solutions. Alternatively, dedicated backup plugins like UpdraftPlus or Duplicator can automate this process. Ensure your backup includes both your WordPress files and your database.
2. Choose Reputable Plugins
The WordPress plugin directory alone hosts tens of thousands of plugins, and countless more are available from third-party developers. Not all plugins are created equal. When selecting a plugin, consider the following:
- Source: Stick to the official WordPress Plugin Directory (wordpress.org/plugins) for free plugins, as they undergo a review process. For premium plugins, purchase directly from reputable developers or established marketplaces.
- Reviews and Ratings: High ratings and positive reviews from a large number of users are good indicators of a plugin’s quality and reliability.
- Last Updated: A frequently updated plugin suggests active development, security patches, and compatibility with the latest WordPress versions. Avoid plugins that haven’t been updated in over a year.
- Active Installations: A high number of active installations (e.g., 100,000+) often signifies a well-tested and popular plugin.
- Compatibility: Check if the plugin is compatible with your current version of WordPress. This information is usually found on the plugin’s page.
- Support: Look for active support forums or a clear support policy from the developer. Good support is invaluable if you encounter issues.
3. Consider a Staging Environment
For mission-critical websites or if you’re installing a complex plugin, consider testing it on a staging site first. A staging site is a clone of your live website that allows you to experiment with changes, updates, and new plugins without affecting your live audience. Many hosting providers offer staging environment tools. This is an advanced but highly recommended best practice for professionals.
Method 1: Installing Plugins from the WordPress Plugin Directory (Most Common)
This is by far the easiest and most common way to install a free plugin on your WordPress site. It’s done directly from your WordPress dashboard.
Step-by-Step Guide:
- Access Your WordPress Dashboard: Log in to your WordPress admin area. The URL is typically
yourdomain.com/wp-admin. - Navigate to “Plugins” -> “Add New”: In the left-hand sidebar, hover over “Plugins” and click “Add New.”
- Search for Your Plugin: On the “Add Plugins” page, you’ll see a search bar on the top right. Type the name of the plugin you’re looking for (e.g., “Rank Math,” “WooCommerce,” “WPForms”) or keywords related to its functionality (e.g., “SEO,” “contact form,” “security”).
- Identify and Install the Plugin: Browse the search results. Once you find the correct plugin, click the “Install Now” button next to its listing. WordPress will download and install the plugin files for you.
- Activate the Plugin: After installation, the “Install Now” button will change to “Activate.” You MUST click “Activate” for the plugin to become active and functional on your site. If you navigate away without activating, the plugin will remain installed but inactive. You can always activate it later from the “Installed Plugins” page.
Once activated, the plugin may add a new menu item to your dashboard (usually under “Settings” or its own dedicated section) where you can configure its options. Always check the plugin’s documentation for initial setup instructions.
Method 2: Uploading a Plugin (for Premium or Custom Plugins)
This method is used when you have a plugin file in .zip format on your computer. This is common for premium (paid) plugins downloaded from a developer’s website or custom plugins developed specifically for your site.
When to Use This Method:
- You’ve purchased a premium plugin and downloaded its
.zipfile. - You’re installing a custom plugin that isn’t available in the WordPress directory.
- You’re installing an older version of a plugin for compatibility reasons.
Step-by-Step Guide:
- Obtain the Plugin
.zipFile: Make sure you have the plugin’s.zipfile downloaded to your computer. Crucially, do NOT unzip it. WordPress needs the compressed.zipfile. - Access Your WordPress Dashboard: Log in to
yourdomain.com/wp-admin. - Navigate to “Plugins” -> “Add New”: In the left-hand sidebar, hover over “Plugins” and click “Add New.”
- Click “Upload Plugin”: At the top of the “Add Plugins” page, you’ll see an “Upload Plugin” button. Click it.
- Choose File and Install: Click the “Choose File” button, then navigate to your computer and select the plugin’s
.zipfile. Once selected, click “Install Now.” - Activate the Plugin: After the upload and installation are complete, click the “Activate Plugin” link.
Common Issue: “The uploaded file exceeds the upload_max_filesize directive in php.ini.” This error means the plugin’s .zip file is larger than your server’s allowed file upload limit. You’ll either need to increase this limit (via your hosting provider or by editing php.ini, .htaccess, or wp-config.php – consult your host’s support or our guides and tutorials for details) or use the manual FTP installation method described next.
For those seeking specialized functionalities or advanced features beyond what free options provide, exploring quality premium WordPress plugins can unlock significant potential for your website.
Method 3: Manually Installing Plugins via FTP (Advanced Method)
This method is more technical and involves using an FTP (File Transfer Protocol) client to upload plugin files directly to your server. It’s often necessary in specific scenarios:
- When the WordPress dashboard upload method fails due to file size limits or other server errors.
- When troubleshooting a site that has been locked out of the admin dashboard.
- For developers who prefer direct file management.
Prerequisites:
- FTP Client: Software like FileZilla (free and highly recommended), Cyberduck, or Transmit.
- FTP Credentials: Your FTP username, password, host (usually your domain name or IP address), and port (usually 21). You can get these from your hosting provider’s control panel.
- Unzipped Plugin Folder: Unlike the upload method, you need the plugin’s folder, not the
.zipfile.
Step-by-Step Guide:
- Download and Unzip the Plugin: Download the plugin’s
.zipfile to your computer. Then, unzip it. You should now have a folder with the plugin’s name (e.g.,seo-by-rank-math). - Connect to Your Website via FTP: Open your FTP client and enter your FTP credentials. Connect to your server.
- Navigate to the
wp-content/plugins/Directory: Once connected, you’ll see your website’s file structure. Navigate topublic_html/wp-content/plugins/(the exact path might vary slightly depending on your hosting setup). This is where all your WordPress plugins reside. - Upload the Plugin Folder: On the left side of your FTP client, locate the unzipped plugin folder on your computer. Drag and drop this folder into the
wp-content/plugins/directory on the right side (your server). Ensure you upload the *entire folder*, not just its contents. - Activate from WordPress Dashboard: Once all files have been uploaded (this might take a few minutes for larger plugins), log in to your WordPress dashboard. Go to “Plugins” -> “Installed Plugins.” You should see the newly uploaded plugin listed. Click “Activate” next to its name.
Potential Pitfalls: Ensure all files are uploaded completely. Incomplete uploads can lead to plugin errors. Also, sometimes file permissions might need to be adjusted (e.g., to 755 for folders and 644 for files) if you encounter issues, though this is less common with standard uploads.
Post-Installation Best Practices and Management
Installing a plugin is just the first step. Proper management ensures your site remains stable, secure, and performs optimally.
1. Configuration
Most plugins require some configuration after activation. This might involve entering API keys, setting up specific options, or integrating with other services. Always refer to the plugin’s documentation or its settings page in the WordPress dashboard for initial setup instructions.
2. Testing
After installing and configuring a new plugin, thoroughly test your website. Check key functionalities, navigate through different pages, and ensure everything is working as expected. Look out for:
- Broken layouts or styling issues.
- Slow page load times.
- Errors appearing on the screen.
- Conflicts with existing plugins or your theme.
If you notice any issues, try deactivating the new plugin. If the problem disappears, you’ve likely found a conflict.
3. Updates
Regularly updating your plugins is paramount for security, compatibility, and accessing new features. Developers frequently release updates to patch vulnerabilities, improve performance, and ensure compatibility with the latest WordPress versions. You’ll see notifications for available updates in your WordPress dashboard under “Dashboard” -> “Updates” or “Plugins” -> “Installed Plugins.” Always back up before performing major updates!
4. Deactivating vs. Deleting
- Deactivating: This temporarily disables a plugin. Its files remain on your server, and its settings are usually preserved. This is useful for troubleshooting conflicts or if you only need a plugin for a short period.
- Deleting: This removes all plugin files and often its associated database entries from your server. Only delete plugins you’re sure you won’t use again. Deleting a plugin completely frees up server space and cleans your database. Be aware that some plugins leave behind database tables even after deletion; you might need to manually remove these if you want a completely clean slate.
5. Performance Considerations
While plugins are great, installing too many, or poorly coded ones, can slow down your website. Each plugin adds code and often queries your database, which consumes server resources. Periodically review your installed plugins: if you’re not actively using a plugin, deactivate and delete it.
6. Troubleshooting Common Plugin Issues
Despite best practices, you might encounter issues. Here’s how to approach them:
- Plugin Conflicts: The most common issue. If your site breaks after activating a new plugin, deactivate it immediately. If the issue resolves, you have a conflict. To identify the conflicting plugin, deactivate all plugins (except the problem one) and reactivate them one by one, testing your site after each activation.
- White Screen of Death (WSOD): This usually indicates a fatal PHP error. If you’re locked out of your admin area, you’ll need to use FTP to deactivate the problematic plugin. Navigate to
wp-content/plugins/and rename the folder of the last installed/updated plugin (e.g.,problematic-plugin-old). This effectively deactivates it. - Compatibility Warnings: If a plugin warns about incompatibility with your WordPress version, heed the warning. It might not function correctly or could cause issues.
- Check Error Logs: Many hosting providers offer access to PHP error logs. These can pinpoint the exact issue.
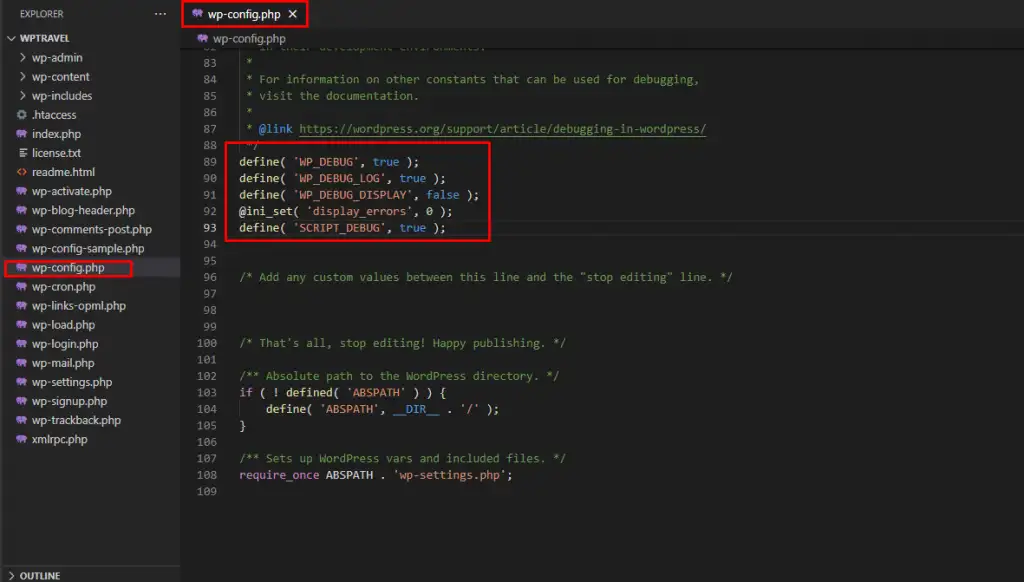
- WordPress Debug Mode: Enable WordPress debug mode (by editing
wp-config.php) to display errors directly on your screen, which can help diagnose problems. Remember to turn it off on a live site.
Choosing the Right Plugins: What to Look For Beyond Installation
Knowing how to install plugins is just one piece of the puzzle. Choosing the right ones is equally, if not more, important for your site’s long-term health and success. Always prioritize plugins that demonstrate:
- Strong Security Practices: Well-maintained plugins follow secure coding standards and release patches promptly for vulnerabilities.
- Regular Updates and Active Development: As mentioned, this is a strong indicator of a healthy plugin.
- Excellent Performance: Plugins should be optimized for speed and not bloat your site with unnecessary code or resources.
- Reliable Support: Responsive support can be a lifesaver when you encounter issues or need guidance.
- Compatibility: Not just with WordPress, but also with your theme and other essential plugins.
- Clear Documentation: Good documentation helps you understand how to use and configure the plugin effectively.
- Developer Reputation: Consider the track record of the plugin developer or company. Are they known for quality products and good support?
Conclusion
WordPress plugins are powerful tools that unlock the full potential of your website. By mastering the installation process – whether through the intuitive dashboard search, a quick upload, or a more technical FTP transfer – you gain the ability to customize, enhance, and secure your site to an extraordinary degree. Remember the golden rules: always back up, choose reputable plugins, and keep everything updated.
With this comprehensive guide, you’re now equipped to confidently navigate the world of WordPress plugins. Go forth, explore the vast possibilities, and transform your website into the dynamic, feature-rich platform you envision. Happy building!
- How to Rename WordPress Theme Folder (Without Errors)
- How to Extract a .wpress File: Your Comprehensive Guide to Unpacking WordPress Backups
- How to Handle Common Elementor Errors: Your Ultimate Troubleshooting Guide
- How to Install Flatsome Theme on WordPress: A Complete Step-by-Step Guide
- Fixing YouTube Video Display Errors in WordPress: A Comprehensive Troubleshooting Guide
Related articles:
-

Unlock Any Site’s Secret: WordPress Theme Detector
-

Ultimate WordPress Hosting Guide: Speed & Security
-

Install WordPress: Your Complete Step-by-Step Guide
-

How to Rename WordPress Theme Folder (Without Errors)
-
Fixing YouTube Video Display Errors in WordPress: A Comprehensive Troubleshooting Guide
-

How to Extract a .wpress File: Your Comprehensive Guide to Unpacking WordPress Backups
-

How to Handle Common Elementor Errors: Your Ultimate Troubleshooting Guide
-

How to Install Flatsome Theme on WordPress: A Complete Step-by-Step Guide
-

How to Enable Debug Mode in WordPress: Your Essential Guide to Troubleshooting Errors
-

How to Create a Child Theme for Any WordPress Theme: The Definitive Guide
-
Guide to Installing WordPress Themes: A Comprehensive Step-by-Step Tutorial
-

How to Find, Create, and Master Your WordPress .htaccess File