How to Create a Child Theme for Any WordPress Theme: The Definitive Guide
As a WordPress user, you’ve likely encountered the dilemma: you want to customize your theme to perfectly match your brand or functionality needs, but you dread the next theme update. Why? Because without the right approach, all your hard work—custom styles, unique functions, and layout tweaks—can be instantly wiped out. This is where the mighty WordPress child theme comes into play. It’s not just a convenience; it’s a fundamental best practice for any serious WordPress site owner or developer.
In this definitive guide, we’ll demystify the process of creating a child theme for any WordPress theme. Whether you’re a beginner looking for a safer way to personalize your site or an experienced developer aiming for cleaner, more maintainable code, understanding and implementing a child theme is crucial. We’ll cover everything from what a child theme is, why it’s indispensable, to detailed step-by-step methods for creating and customizing one, ensuring your site remains robust, flexible, and update-proof.
What Exactly is a WordPress Child Theme?
At its core, a WordPress child theme is a theme that inherits the functionality, features, and styling of another theme, known as the parent theme. Think of it like this: the parent theme is the robust foundation and main structure of a house, complete with all its rooms and amenities. A child theme is an extension or renovation that you build on top of or around that existing structure. You can paint walls, add new fixtures, or even build an extra room, all without altering the original blueprints of the main house.
This relationship is incredibly powerful. When the parent theme receives an update (which often includes security patches, new features, and bug fixes), you can update it without fear. Your customizations, safely housed within the child theme, remain untouched and continue to function as intended. Without a child theme, any direct modifications you make to a parent theme’s files would be overwritten the moment you click “Update.”
Why You Absolutely Need a Child Theme for Your WordPress Site
The benefits of using a child theme extend far beyond simply preserving customizations. They contribute to a more stable, secure, and maintainable WordPress environment. Here’s why every WordPress installation should consider implementing one:
1. Protect Your Customizations During Updates
This is the most significant and immediate benefit. Theme developers regularly release updates to improve performance, add features, fix bugs, and patch security vulnerabilities. Updating your theme is essential for the health and security of your website. A child theme ensures that you can always apply these critical updates without losing any of the unique modifications you’ve made to your site’s design or functionality.
2. Safer Experimentation and Development
A child theme provides a sandbox for experimentation. You can modify CSS, add custom functions, or override template files in your child theme without directly touching the parent theme’s code. If something breaks or doesn’t look right, you can easily revert your child theme changes or deactivate it without affecting the core parent theme. This makes debugging much simpler and less risky.
3. Cleaner and More Organized Code
By keeping your customizations separate from the parent theme, your code remains much cleaner and easier to manage. You know exactly where your custom CSS, JavaScript, and PHP functions reside. This organization is invaluable, especially when working on complex projects or collaborating with other developers. It also makes it easier to track changes and roll back specific modifications if necessary.
4. Accelerated Development
Starting with a robust parent theme and then building on it with a child theme can significantly speed up development. Instead of coding everything from scratch, you leverage the existing framework of a well-developed theme and only add or modify what’s necessary. This allows you to focus on unique features and designs rather than foundational elements.
5. Easier Maintenance and Debugging
When issues arise, a child theme simplifies the troubleshooting process. If your site experiences problems after a customization, you know to look within your child theme’s files first. If the problem persists after deactivating the child theme, it indicates an issue with the parent theme or another plugin, narrowing down your investigation significantly.
Prerequisites for Creating a Child Theme
Before diving into the creation process, ensure you have the following:
- Access to your WordPress Files: This can be via FTP (File Transfer Protocol) client (like FileZilla), your hosting provider’s cPanel File Manager, or an SSH connection.
- A Code Editor: A plain text editor (like Notepad on Windows, TextEdit on Mac) will work, but a dedicated code editor (like VS Code, Sublime Text, Atom, or Notepad++) is highly recommended for syntax highlighting and other developer-friendly features.
- Basic Understanding of WordPress File Structure: Knowing where the
wp-content,themes, and other core directories are located will be helpful. - Your Parent Theme’s Directory Name: You’ll need this exact name to link your child theme correctly. You can find this by navigating to
wp-content/themes/in your file manager and noting the folder name of your active parent theme (e.g.,twentytwentythree,astra,kadence).
Method 1: Manually Creating a Child Theme (Recommended for Control)
This method provides the most control and is essential for understanding how child themes work under the hood. It’s a straightforward process involving just a few files.
Step 1: Create a New Folder for Your Child Theme
Using your FTP client or File Manager, navigate to the wp-content/themes/ directory. Inside this directory, create a new folder for your child theme. It’s a good practice to name it something intuitive, like your parent theme’s name followed by -child (e.g., if your parent theme is astra, name the child theme folder astra-child).
Step 2: Create the style.css File
Inside your newly created child theme folder (e.g., astra-child), create a new file named style.css. This file is crucial as it identifies your theme as a child theme and defines its properties. Add the following header comments to this file:
/*
 Theme Name:   My Parent Theme Child
 Theme URI:    https://example.com/my-parent-theme-child/
 Description:  My Parent Theme Child Theme
 Author:       Your Name
 Author URI:   https://example.com
 Template:     my-parent-theme
 Version:      1.0.0
 License:      GNU General Public License v2 or later
 License URI:  http://www.gnu.org/licenses/gpl-2.0.html
 Text Domain:  my-parent-theme-child
*/
Important Notes for style.css:
Theme Name:This is the name that will appear in your WordPress admin area under Appearance > Themes. Choose a descriptive name, like “Astra Child” or “Kadence Child.”Template:This is the most critical line. It MUST be the exact directory name of your parent theme. Case-sensitive! If your parent theme folder is namedastra, thenTemplate: astra. If it’stwentytwentythree, thenTemplate: twentytwentythree. Double-check this to avoid errors.- All other fields are optional but recommended for good practice and to provide information about your theme.
Step 3: Enqueue Parent Theme Styles in functions.php
In older WordPress versions, you might have seen tutorials that use @import in style.css to pull in the parent theme’s styles. This method is outdated and can cause performance issues and incorrect loading order. The modern and recommended way is to enqueue the parent theme’s stylesheet using a functions.php file in your child theme.
Inside your child theme folder (e.g., astra-child), create a new file named functions.php. Add the following code to it:
<?php
/**
 * My Parent Theme Child functions and definitions
 *
 * @link https://developer.wordpress.org/themes/basics/theme-functions/
 *
 * @package My_Parent_Theme_Child
 */

if ( ! function_exists( 'my_parent_theme_child_enqueue_styles' ) ) :
    /**
     * Enqueue parent and child theme styles
     */
    function my_parent_theme_child_enqueue_styles() {
        wp_enqueue_style( 'my-parent-theme-style', get_template_directory_uri() . '/style.css' );
        wp_enqueue_style( 'my-parent-theme-child-style',
            get_stylesheet_directory_uri() . '/style.css',
            array( 'my-parent-theme-style' ),
            wp_get_theme()->get('Version')
        );
    }
endif;
add_action( 'wp_enqueue_scripts', 'my_parent_theme_child_enqueue_styles' );
?>
Explanation of the functions.php code:
- The
wp_enqueue_style()function is WordPress’s proper way to load stylesheets. get_template_directory_uri() . '/style.css'refers to the parent theme’sstyle.css.get_stylesheet_directory_uri() . '/style.css'refers to your child theme’sstyle.css.array( 'my-parent-theme-style' )ensures that your child theme’s stylesheet is loaded *after* the parent theme’s stylesheet, allowing your child theme styles to correctly override parent theme styles.wp_get_theme()->get('Version')dynamically pulls the child theme’s version for caching busting purposes, which is good practice.
Step 4: Activate the Child Theme
Now that you’ve created the necessary files, log in to your WordPress admin dashboard. Go to Appearance > Themes. You should see your new child theme listed, likely with a screenshot from the parent theme. Click “Activate.”
Step 5: Test Your Child Theme
After activation, visit your website. It should look exactly the same as it did with the parent theme active. This confirms that the child theme is correctly inheriting styles and functionality. To further test, add a simple CSS rule to your child theme’s style.css, such as:
body {
    background-color: #f0f8ff; /* Alice Blue */
}
Save the file and refresh your website. If the background color changes, your child theme is working perfectly!
Method 2: Creating a Child Theme Using a Plugin (Beginner-Friendly)
For those who prefer a more automated approach or are less comfortable with file management, several plugins can create a child theme with just a few clicks. This method is excellent for beginners but offers less insight into the underlying process.
Why Use a Plugin?
- Ease of Use: No need to touch FTP or code editors.
- Speed: A child theme can be generated in seconds.
- Reduced Error: Plugins handle the correct naming and enqueuing of styles, minimizing human error.
Popular Child Theme Creation Plugins:
- Child Theme Configurator: This is arguably the most comprehensive and popular plugin. It allows you to analyze your parent theme, create the child theme, and even copy customizations.
- Generate Child Theme: A simpler plugin that focuses solely on creating the child theme folder and essential files.
Steps Using a Generic Child Theme Plugin:
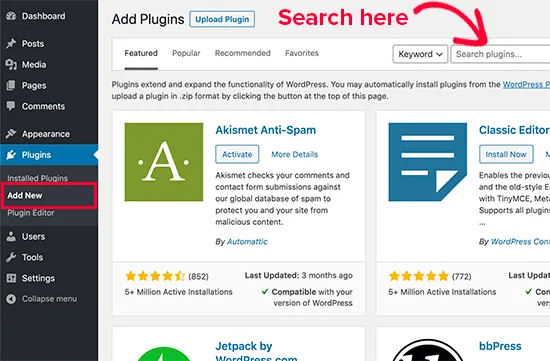
- Install and Activate: Go to your WordPress Dashboard, navigate to Plugins > Add New. Search for “Child Theme Configurator” or “Generate Child Theme,” install, and activate it.
- Navigate to Plugin Settings: For Child Theme Configurator, you’ll usually find it under Tools > Child Theme. For simpler plugins, it might be directly under Appearance or its own menu item.
- Select Parent Theme: The plugin will typically ask you to select the parent theme from a dropdown list.
- Configure (if applicable): Some plugins, like Child Theme Configurator, offer advanced options like choosing to copy widgets, menus, or customizer settings from the parent theme. For most basic setups, you can stick with the defaults.
- Create/Generate: Click the button to create or generate your child theme.
- Activate: After creation, the plugin will usually prompt you to activate the new child theme, or you can go to Appearance > Themes and activate it manually.
Even when using a plugin, it’s beneficial to understand the manual process as it helps you debug and modify the child theme’s files later if needed. For developers and those seeking deeper control over their WordPress installations, exploring WordPress solutions and mastering child theme creation is a key skill.
Customizing Your Child Theme: Taking the Next Steps
Once your child theme is active, you can begin making customizations with confidence. Here’s how you typically modify your site using a child theme:
1. Modifying style.css
The style.css file in your child theme is where you’ll add most of your custom CSS rules. Since your child theme’s stylesheet is loaded after the parent theme’s, any CSS rules you add here will override conflicting rules in the parent theme. Just add your custom CSS at the end of the file (after the initial header comments).
2. Overriding functions.php
The functions.php file in a child theme is special. Unlike style.css, it doesn’t override the parent theme’s functions.php. Instead, it is loaded *in addition* to the parent theme’s functions.php (specifically, before it). This means you can add new functions without affecting the parent theme’s functions. If you need to modify a parent theme function, you often have to “unhook” it first (if the parent theme’s developer made it pluggable) or write a new function with a higher priority that achieves the desired effect.
Example: Adding a custom function:
<?php
// (Existing enqueue code will be here)

// Add a custom footer text
function my_child_theme_custom_footer_text() {
    echo '<p>© ' . date('Y') . ' CodeMMO. All rights reserved.</p>';
}
add_action( 'wp_footer', 'my_child_theme_custom_footer_text' );

?>
3. Overriding Template Files
To modify the layout or structure of a specific page, post, or archive, you can override template files from the parent theme. For example, if you want to change the layout of single posts, you would copy the single.php file from your parent theme into your child theme folder. WordPress will then use your child theme’s single.php instead of the parent’s. You can then edit this copied file as needed.
This principle applies to almost any template file: header.php, footer.php, page.php, archive.php, sidebar.php, etc. Just make sure the file structure within your child theme mirrors the parent theme if the file is in a subfolder (e.g., template-parts/content.php in the parent becomes your-child-theme/template-parts/content.php).
4. Adding New Files
You can also add entirely new files to your child theme. For instance, you might create a new custom page template (e.g., template-full-width.php) or include new JavaScript files. Just make sure to enqueue any new scripts or styles correctly using the wp_enqueue_script() or wp_enqueue_style() functions in your child theme’s functions.php.
Best Practices for Child Theme Development
To ensure your child theme serves you well in the long run, adhere to these best practices:
- Keep it Lean: Only add files and code to your child theme that are absolutely necessary for your customizations. Avoid copying entire sections of the parent theme unless you truly need to modify them.
- Use Specificity in CSS: When overriding parent theme styles, use more specific CSS selectors to ensure your rules take precedence without relying too heavily on
!important. - Comment Your Code: Clearly comment any custom code you add to your
style.cssandfunctions.php. This helps you and others understand your changes in the future. - Test Thoroughly: After making any changes, always test your website thoroughly across different browsers and devices to ensure everything looks and functions as expected.
- Use Version Control (for developers): If you’re managing a complex site, consider using Git for version control. This allows you to track changes, experiment safely, and easily revert if something goes wrong.
- Backup Regularly: Even with a child theme, regular backups of your entire WordPress site are crucial. Accidents happen, and a recent backup is your best defense.
- Explore More: For more in-depth knowledge and advanced customization techniques, remember to regularly check out the CodeMMO guide section. Continuous learning is key to mastering WordPress.
Common Issues and Troubleshooting
Even with the best intentions, you might run into a few snags. Here are some common child theme issues and how to resolve them:
1. Child Theme Not Activating or Showing in Dashboard
- Check
Template:Line: The most common culprit. Ensure theTemplate:line in your child theme’sstyle.cssexactly matches the parent theme’s directory name (case-sensitive). - Correct Folder Structure: Make sure your child theme folder is directly inside
wp-content/themes/. - File Permissions: Ensure your child theme folder and files have correct read/write permissions (typically 755 for folders and 644 for files).
2. Styles Not Loading or Site Looks Unstyled
functions.phpEnqueue Issue: Double-check thefunctions.phpcode you used to enqueue the parent theme’s stylesheet. Any typos or incorrect function names can prevent styles from loading. Ensure theget_template_directory_uri()is correctly pointing to the parent.- Caching: Clear your browser cache, any WordPress caching plugins, and server-side caches. Sometimes old styles are served from cache.
- Incorrect
@import: If you used@importinstyle.cssinstead ofwp_enqueue_style()infunctions.php, switch to the enqueue method.
3. Blank White Screen (White Screen of Death)
- This usually indicates a PHP error.
- Check
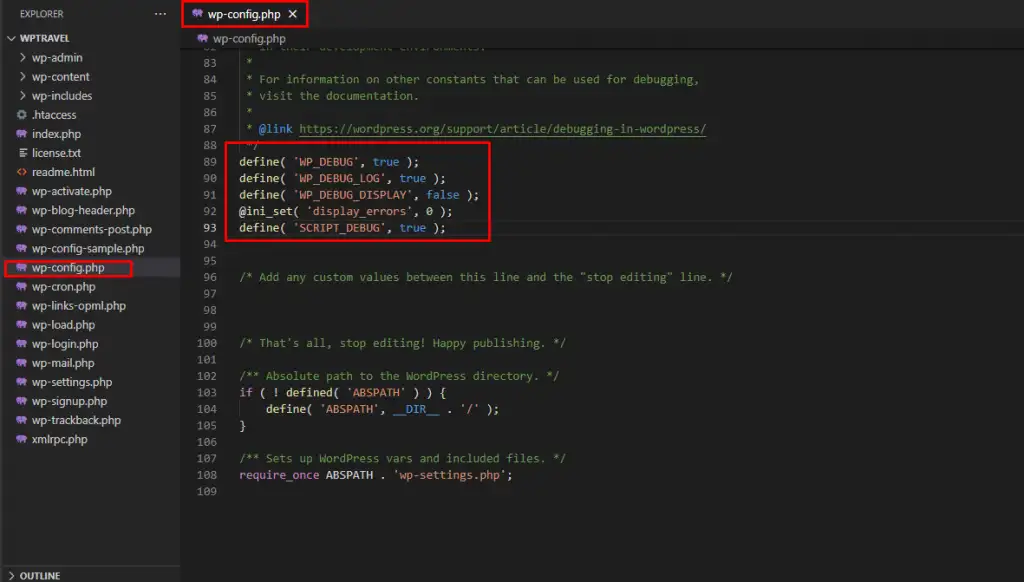
functions.php: A syntax error (missing semicolon, bracket, etc.) in your child theme’sfunctions.phpis a common cause. - Debug Mode: Enable WordPress debug mode by adding
define( 'WP_DEBUG', true );anddefine( 'WP_DEBUG_LOG', true );to yourwp-config.phpfile. This will either show errors on screen or log them towp-content/debug.log, helping you pinpoint the problem. - Deactivate Child Theme: If you can access your site via FTP, rename your child theme’s folder temporarily (e.g., from
astra-childtoastra-child-old). This will automatically deactivate the child theme, and your site should return to normal, confirming the issue is with the child theme.
Conclusion
Creating a child theme for your WordPress website is not just an option; it’s a fundamental step towards responsible and sustainable WordPress development. It empowers you to customize your site exactly how you envision it, all while safeguarding your hard work against theme updates. Whether you choose the manual route for precise control or opt for a plugin for convenience, the benefits of a child theme are clear: a more stable, secure, and flexible website.
By following the steps and best practices outlined in this guide, you’re now equipped with the knowledge to build a robust foundation for all your future WordPress customizations. Embrace the child theme, update your parent theme with confidence, and continue to evolve your website without fear of losing your unique identity.
- How to Find, Create, and Master Your WordPress .htaccess File
- The Ultimate Guide to Installing WordPress Plugins: Step-by-Step for Every User
- How to Create a Child Theme for Any WordPress Theme: The Definitive Guide
- Guide to Installing WordPress Themes: A Comprehensive Step-by-Step Tutorial
- Fixing YouTube Video Display Errors in WordPress: A Comprehensive Troubleshooting Guide
Related articles:
-

Unlock Any Site’s Secret: WordPress Theme Detector
-

Ultimate WordPress Hosting Guide: Speed & Security
-

Install WordPress: Your Complete Step-by-Step Guide
-

How to Rename WordPress Theme Folder (Without Errors)
-
Fixing YouTube Video Display Errors in WordPress: A Comprehensive Troubleshooting Guide
-

How to Extract a .wpress File: Your Comprehensive Guide to Unpacking WordPress Backups
-

How to Handle Common Elementor Errors: Your Ultimate Troubleshooting Guide
-

How to Install Flatsome Theme on WordPress: A Complete Step-by-Step Guide
-

How to Enable Debug Mode in WordPress: Your Essential Guide to Troubleshooting Errors
-
Guide to Installing WordPress Themes: A Comprehensive Step-by-Step Tutorial
-

The Ultimate Guide to Installing WordPress Plugins: Step-by-Step for Every User
-

How to Find, Create, and Master Your WordPress .htaccess File